
True Freezer Controller Manual: A Comprehensive Guide
This manual details True freezer controllers, including Dixell and LAE types, offering troubleshooting for error codes like P1. It covers temperature adjustments, defrost cycle management, and replacement guides for models like the T-49/F series.
Understanding True Freezer Controllers
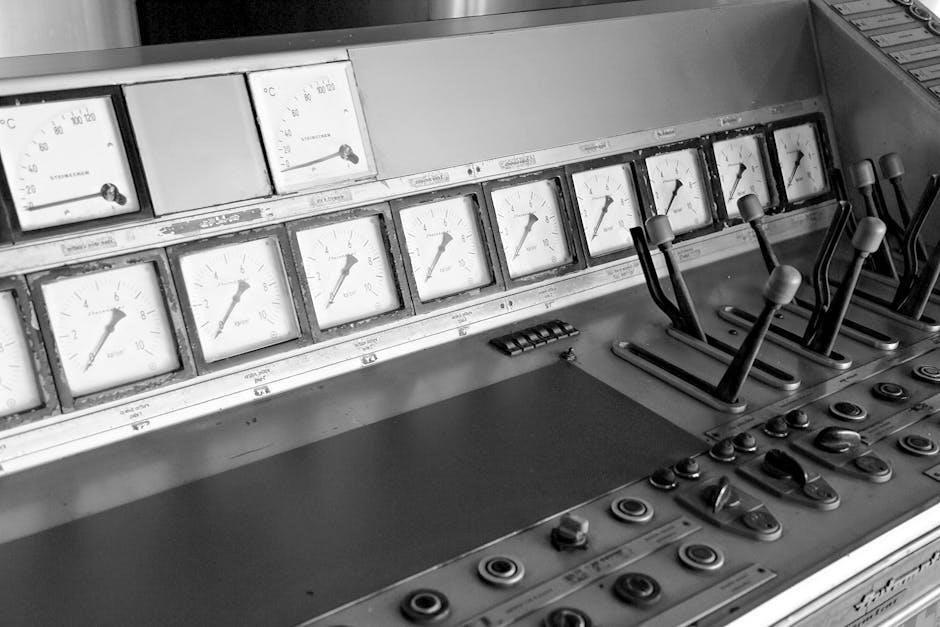
True freezer controllers are essential for maintaining consistent and safe temperatures within commercial refrigeration units. These controllers, often Dixell or LAE models, regulate compressor cycles, defrost functions, and temperature displays. Understanding their operation is crucial for efficient freezer performance and preventing food spoilage. Controllers are typically located within the compressor section or behind panels above the case.
Proper functionality relies on accurate temperature sensing and precise control algorithms. Controllers manage defrost intervals, preventing ice buildup that reduces cooling efficiency. Troubleshooting issues often involves interpreting error codes and adjusting controller parameters. Regular maintenance and familiarity with specific model settings are key to maximizing the lifespan and reliability of these vital components.
Common Controller Types
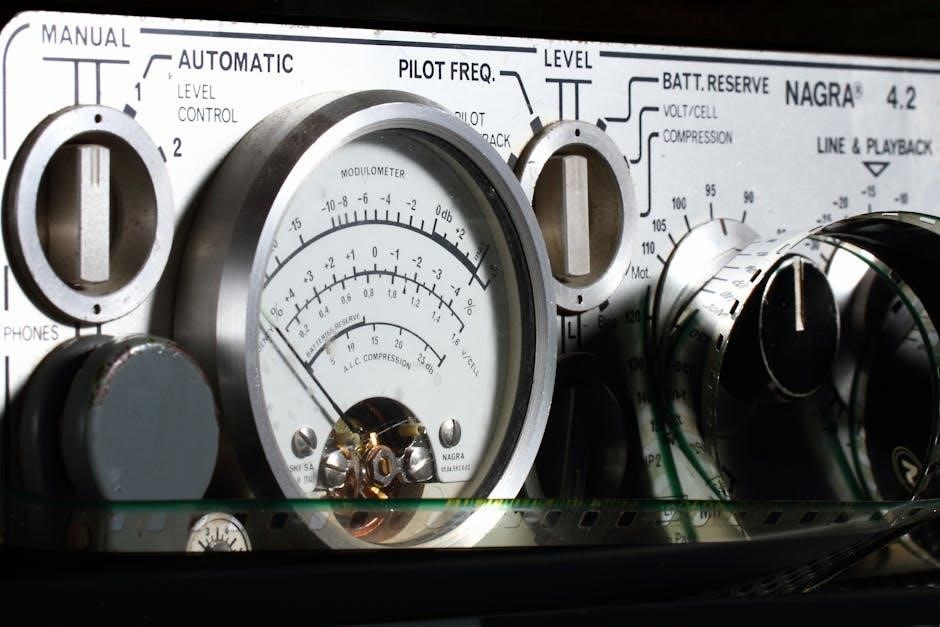
True freezers commonly utilize two primary controller types: Dixell and LAE; Dixell controllers are known for their user-friendly interfaces and advanced features, offering precise temperature control and monitoring capabilities. LAE controllers, while also effective, may have a slightly different programming structure. Identifying the specific controller type is the first step in troubleshooting or making adjustments.
Both types require unlocking the interface – typically by holding down two buttons simultaneously – to access parameters. Understanding the specific parameter codes for each controller is essential for accurate temperature adjustments and defrost cycle management. Genuine True refrigeration kits often include compatible controllers for various models.
Dixell Controllers
Dixell controllers, frequently found in commercial True freezers, offer robust temperature management. Accessing parameters generally involves pressing and holding two buttons – often ‘SET’ and another function key – to unlock the interface. Users can then navigate through settings to adjust temperature setpoints, defrost cycles, and other critical functions.
These controllers are praised for their clear displays and relatively intuitive programming. However, specific parameter codes vary by model, necessitating reference to the controller’s documentation or online resources like refrigeration forums (r/refrigeration). Proper configuration ensures optimal freezer performance and prevents issues like excessive defrosting;
LAE Controllers
LAE controllers represent another common electronic control system utilized in True refrigeration equipment. Like Dixell units, they are typically located within the compressor section or behind a panel above the freezer case. Troubleshooting often begins with verifying the controller isn’t initiating excessive defrost cycles – a potential symptom of incorrect interval settings.
Reddit’s r/refrigeration forum suggests contacting True tech support for assistance navigating LAE controller settings. Users should be aware that improper configuration can lead to temperature fluctuations and compromised food safety. Understanding the parameter settings is crucial for maintaining consistent and efficient freezer operation.
Error Codes and Troubleshooting
True freezer controllers utilize error codes to signal malfunctions, aiding in efficient diagnostics. A frequently encountered code is P1, often indicating a problem with the temperature controller itself. Techtown’s resources highlight that a P1 error commonly appears when the controller fails, necessitating replacement. Systematic troubleshooting is vital before assuming component failure.
Addressing defrost issues is also critical; excessive defrosting, as discussed on r/refrigeration, can stem from incorrect interval settings. Confirming the interval is set to ‘1’ rather than ‘24’ prevents frequent, energy-wasting defrost cycles. Proper diagnosis ensures accurate repairs and minimizes downtime.
P1 Error Code: Common Causes
The P1 error code on True freezers predominantly signals a malfunctioning temperature controller. As highlighted by Techtown, this is a frequent outcome when the controller component itself fails to operate correctly. However, it’s crucial to avoid immediate component replacement without thorough investigation. Potential causes include wiring issues, power supply fluctuations, or internal controller defects.
Before replacing the controller, verify all connections are secure and the unit receives consistent power. Inspect wiring for damage or corrosion. If the issue persists, the controller likely requires replacement, but confirming these preliminary checks can save time and resources.
Addressing Defrost Issues
Defrost problems in True freezers often stem from incorrect controller settings, particularly the defrost interval. Reddit’s r/refrigeration forum emphasizes checking if the interval is set to ‘1’ or ‘24’. A setting of ‘24’ initiates defrost cycles 24 times daily, leading to warmer temperatures and excessive energy consumption. Proper defrost management is vital for efficient operation.
Ensure the defrost heater is functioning correctly and the defrost termination thermostat is operational. Incorrect settings or faulty components can cause ice buildup, reducing cooling capacity. Regularly inspect these components to prevent performance degradation and maintain optimal freezer temperatures.
Temperature Adjustment Procedures
Adjusting the temperature on a True freezer requires accessing the controller parameters. Typically, these controllers – Dixell or LAE – are located in the compressor section or above the case. According to r/refrigeration, unlocking the controller interface usually involves holding down two buttons simultaneously. Google the specific parameters for your model to understand the adjustment process.
Once unlocked, you can modify the set point to achieve the desired temperature. Be cautious when altering settings, as incorrect adjustments can impact food safety and energy efficiency. Refer to the controller’s documentation for detailed instructions and recommended temperature ranges.
Accessing Controller Parameters
To access the parameters on a True freezer’s temperature controller – often Dixell or LAE – a specific unlocking procedure is required. As noted on r/refrigeration, this generally involves pressing and holding two buttons concurrently. The exact button combination varies depending on the controller model, so identifying your specific controller is crucial.
Once the buttons are held, the display will typically change, indicating access to the parameter menu. From here, you can navigate through the settings using the controller’s buttons to adjust temperature, defrost cycles, and other operational features. Remember to consult model-specific documentation for precise instructions.
Unlocking the Controller Interface
Unlocking the controller interface on a True freezer is essential for adjusting settings; According to online resources, including discussions on r/refrigeration, this typically involves a button-pressing sequence. Generally, you’ll need to hold down two buttons simultaneously – the specific buttons depend on the controller type (Dixell or LAE).
Holding these buttons for a few seconds will unlock the parameter menu, allowing access to temperature setpoints and other configurations. The display will usually change to confirm access. Be cautious, as incorrect parameter adjustments can affect freezer performance. Always refer to the controller’s documentation for the correct procedure.
Defrost Cycle Management
Effective defrost cycle management is crucial for True freezer efficiency. Controllers offer settings to adjust defrost intervals, commonly presented as options ‘1’ or ’24’. A setting of ’24’ initiates a defrost cycle 24 times daily, potentially leading to excessive energy consumption and temperature fluctuations. r/refrigeration users emphasize verifying this setting during troubleshooting.
Optimizing defrost frequency balances ice buildup prevention with energy savings. Consider the freezer’s usage and ambient conditions when adjusting the interval. Infrequent defrosting can cause ice accumulation, reducing cooling capacity, while overly frequent cycles waste energy. Regular monitoring ensures optimal performance.
Defrost Interval Settings (1 vs. 24)
True freezer controllers typically present defrost interval settings as either ‘1’ or ‘24’. Selecting ‘24’ triggers a defrost cycle an astonishing 24 times each day. This frequent defrosting is generally undesirable, leading to significant energy waste and potential temperature instability within the freezer cabinet. r/refrigeration discussions highlight this as a common misconfiguration.
The ‘1’ setting, conversely, initiates a defrost cycle once per day. This is often the preferred and more energy-efficient option for standard operation. However, high humidity environments or frequent door openings might necessitate a more frequent cycle, though rarely as extreme as 24 times daily.
Optimizing Defrost Frequency
Optimizing defrost frequency balances energy efficiency with preventing excessive ice buildup. Too infrequent defrosting leads to thick ice layers, reducing freezer capacity and increasing compressor workload. Conversely, overly frequent cycles waste energy and can stress components. Monitoring ice accumulation is crucial; visually inspect evaporator coils regularly.
Consider environmental factors – high humidity necessitates more frequent defrosts. Adjust the interval based on observed ice buildup, starting with the standard ‘1’ cycle setting. If ice forms rapidly, incrementally increase the frequency, but avoid extremes like the ‘24’ setting unless absolutely necessary. Proper door sealing also minimizes humidity ingress.
Replacing the Temperature Controller
Replacing a True freezer’s temperature controller requires careful attention to detail. Often, a P1 error code signals controller failure, particularly in T-49/F series models. Before replacement, disconnect power and document existing wiring connections – photographs are invaluable. Ensure compatibility with your specific model; using the wrong controller can cause further issues.
Consider kits like the Gladwise (800393, 831932, 800306) or Genuine True kits (077B6806, 077B1212) for simplified installation. These kits typically include the controller, connectors, and a knob. Follow the kit’s instructions meticulously, and double-check all connections before restoring power. Testing is essential post-installation.
True T-49/F Series Replacement Guide
The True T-49 and T-49F freezers utilize a robust temperature controller, but eventual replacement is common. Begin by disconnecting power to the unit. Locate the controller within the compressor section, typically under the case. Carefully document the existing wiring configuration – a photo is highly recommended. Remove the old controller and install the new one, ensuring secure connections.
Pay close attention to terminal placement, referencing your documentation. Verify the controller is firmly seated. Restore power and monitor for proper operation. A P1 error persisting after replacement suggests a wiring issue or incompatible controller. Consult the full manual for detailed diagrams and troubleshooting steps.

Identifying Compatible Replacement Parts
Selecting the correct replacement controller is crucial for optimal performance. Gladwise offers kits (800393, 831932, 800306) specifically designed for True refrigerators and freezers, replacing part number 461387. Genuine True Refrigeration kits, such as 077B6806 (for horizontal refrigerators) and 077B1212 (for freezers), provide OEM compatibility.
Always verify the model number of your True freezer before ordering. Cross-reference the existing controller’s part number if possible. Consider purchasing a kit that includes terminal connectors and knobs for a complete replacement. Confirm compatibility with your specific series (TC/TSD/T/GDM/GEM/G4SM) to avoid issues.
Specific Model Compatibility
True freezers utilize various controllers, demanding careful part selection. Gladwise thermostat kits (800393, 831932, 800306) are widely compatible across TC/TSD/T/GDM/GEM/G4SM series. Genuine True Refrigeration kits offer direct replacements; 077B6806 suits horizontal refrigerators, while 077B1212 is designed for freezers.
Compatibility extends to models experiencing P1 error codes, often indicating controller failure. When replacing, ensure the kit matches your freezer’s specific series and configuration. Consult True’s documentation or tech support for precise model matching. Incorrect parts can lead to malfunction and require further troubleshooting.
Gladwise Thermostat Kits (800393, 831932, 800306)
Gladwise kits (800393, 831932, 800306) provide a cost-effective solution for temperature control replacement in numerous True refrigerator and freezer models. These kits are specifically designed as replacements for part number 461387, ensuring compatibility across a broad range of series including TC, TSD, T, GDM, GEM, and G4SM.
Installation is generally straightforward, though professional assistance is recommended. The kits typically include the temperature controller itself, along with necessary blue terminal connectors and a replacement knob. Verify your model’s compatibility before purchasing to avoid issues. Gladwise offers a readily available and reliable alternative to OEM parts.
Genuine True Refrigeration Kits (077B6806, 077B1212)
Genuine True Refrigeration kits, specifically 077B6806 (for horizontal refrigerators) and 077B1212 (for freezers), represent the manufacturer’s recommended replacement parts for temperature control systems. Kit 077B6806 includes the control unit, blue terminal connectors, and a replacement knob, ensuring a complete solution. Similarly, 077B1212 provides all necessary components for freezer applications.
Using genuine parts guarantees compatibility and maintains the original performance standards of your True equipment. While often more expensive than aftermarket options, they offer reliability and are backed by True’s quality assurance. Proper installation is crucial; consult the True service manual or a qualified technician.
Controller Settings and Parameters
True freezer controllers, whether Dixell or LAE, offer adjustable settings to optimize performance. Temperature display units can typically be switched between Celsius and Fahrenheit to suit user preference. The set point adjustment allows precise control over the target freezer temperature, crucial for maintaining food safety and quality.
Accessing these parameters usually requires unlocking the controller interface by holding down specific button combinations – often two buttons simultaneously. Parameters vary between controller types, so referencing the specific model’s documentation is essential. Understanding these settings enables fine-tuning for energy efficiency and consistent temperature maintenance.
Temperature Display Units
True freezer controllers commonly allow users to select their preferred temperature scale for display. The options generally include Celsius (°C) and Fahrenheit (°F), catering to diverse regional preferences and user familiarity. Switching between these units is typically achieved through the controller’s settings menu, accessed by a specific button sequence.
This adjustment doesn’t affect the actual freezer temperature, only how it’s presented on the display. Accurate interpretation of the temperature reading is vital for proper freezer operation and food safety. Confirming the correct unit is displayed ensures accurate monitoring and prevents misinterpretation of temperature levels.

Set Point Adjustment
Adjusting the set point on a True freezer controller determines the target temperature the unit will maintain. This is crucial for ensuring optimal food preservation and preventing spoilage. Typically, accessing the set point requires unlocking the controller interface, often by holding down two buttons simultaneously.
Once unlocked, users can navigate to the set point parameter and modify it using the up and down arrow buttons. Carefully consider the type of food being stored when setting the temperature; different items require different storage conditions. Always refer to food safety guidelines for recommended temperatures.
Wiring Diagrams and Connections
Understanding the wiring of a True freezer controller is essential for proper installation and troubleshooting. Controllers utilize various connections for power, temperature sensors, defrost heaters, and fan motors. Detailed wiring diagrams are typically found within the controller’s documentation or on the unit itself, often located in the compressor section.
Incorrect wiring can lead to malfunction or damage to the controller and other components. Always disconnect power before working with any electrical connections. Pay close attention to terminal designations and wire colors to ensure correct connections. If unsure, consult a qualified refrigeration technician.
Safety Precautions
Working with refrigeration equipment requires strict adherence to safety protocols. Always disconnect the power supply before accessing or working on the controller or any electrical components. Exercise caution when handling wiring, avoiding shorts or exposed connections. Refrigerant lines carry high pressure; do not attempt to disconnect or repair them without proper training and equipment.
Wear appropriate personal protective equipment (PPE), including safety glasses and insulated gloves. Be mindful of sharp edges and potential pinch points within the freezer unit. If you are uncomfortable or lack experience, consult a qualified refrigeration technician for assistance. Prioritize safety to prevent injury or equipment damage.
Locating the Controller
True freezer controllers are typically found in one of two locations. First, check the compressor section, located at the base of the unit. The controller is usually housed within a small electrical box. Alternatively, access may be gained via a panel located above the freezer case. This panel often requires a screwdriver for removal, revealing the controller behind it.
For some models, the controller’s position varies. Consult model-specific documentation if initial locations prove unsuccessful. Carefully inspect the wiring and components to confirm you’ve identified the correct controller – often a Dixell or LAE unit. Remember to disconnect power before accessing these areas.
Compressor Section Access
Accessing the compressor section requires careful attention to safety. First, disconnect power to the freezer at the breaker. Locate the access panel at the base of the unit, typically at the rear. Remove the panel using a screwdriver, noting any fasteners. Be cautious as this area contains electrical components and the compressor itself.

The controller is usually mounted within a small electrical box. Inspect the wiring and connections before proceeding. Ensure adequate lighting to clearly view the components. Avoid touching any live wires or the compressor. This location is common for both Dixell and LAE controllers.
Panel Access (Above the Case)
In some True freezer models, the controller is located behind a panel above the case. Begin by disconnecting power to the unit at the breaker for safety. Identify the access panel – it’s often secured with screws. Carefully remove the panel, keeping track of the screws. Inside, you’ll find the controller and associated wiring.
Exercise caution when working with electrical components. Inspect the wiring for any loose connections or damage. Good lighting is essential for clear visibility. This access point is particularly relevant for newer True freezers featuring Dixell or LAE controllers. Remember to document the original wiring configuration before making any changes.
Resources and Support
For direct assistance, contact True Tech Support. Their expertise is invaluable for navigating controller settings and troubleshooting complex issues. Online communities, such as the r/refrigeration subreddit, offer a platform for peer-to-peer support and shared knowledge. These forums often contain discussions specific to True freezers and their controllers.
Remember to provide your model number when seeking support. Detailed information about your controller type (Dixell or LAE) is also helpful. Online resources can supplement manufacturer support, offering additional insights and potential solutions. Utilizing these resources ensures efficient diagnosis and repair of your True freezer’s control system.
True Tech Support Contact Information
To reach True’s technical support team directly, it’s recommended to call their dedicated helpline. Unfortunately, specific contact numbers aren’t readily available online and may vary based on your location and the nature of your inquiry. The best approach is to visit the official True Refrigeration website and navigate to their “Contact Us” or “Support” section.
There, you should find a comprehensive list of contact options, including phone numbers, email addresses, and potentially a live chat feature. Be prepared to provide your freezer’s model number and a detailed description of the issue you’re experiencing. Having this information readily available will expedite the support process and ensure a more efficient resolution.
Online Forums (r/refrigeration)
The r/refrigeration subreddit on Reddit serves as a valuable community resource for technicians and individuals working with refrigeration equipment, including True freezers. Users frequently share experiences, troubleshooting tips, and insights related to True freezer controllers and common issues like defrost problems or P1 error codes.
Searching within the subreddit using keywords like “True freezer,” “LAE controller,” or “Dixell” can reveal relevant discussions and potential solutions. Remember to exercise caution and verify information obtained from online forums with official documentation or qualified technicians. However, it’s a great place to find peer support and learn from others’ experiences.